WireGuard内网穿透教程
Table of Contents
网络拓扑结构
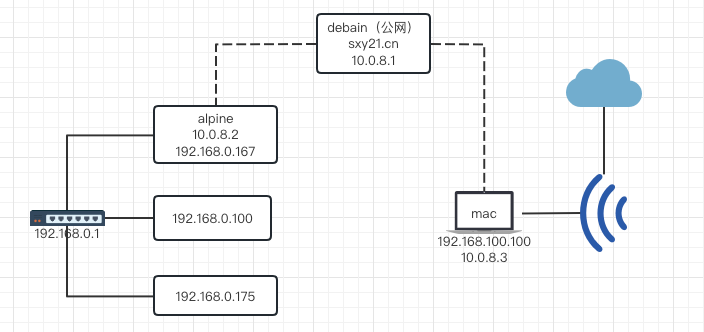
实现内网穿透并访问局域网内的其他服务。
debian 安装 WireGuard
WireGuard(server 端)
# 安装
apt install -y wireguard
cd /etc/wireguard
# 生成私钥
wg genkey > privatekey
# 通过私钥导出公钥
wg pubkey < privatekey > publickey
# 一次性生成私钥和公钥
# wg genkey | tee privatekey | wg pubkey > publickey
编辑配置文件 vim /etc/wireguard/wg0.conf,内如如下:
[Interface]
Address = 10.0.8.1
SaveConfig = true
ListenPort = 51820
PrivateKey = 【debian的私钥】
开机自启动
systemctl enable wg-quick@wg0.service
alpine 安装 WireGuard
alpine 当做中转站,访问到 alpine 即可访问到与 alpine 同网段的计算机,需要 开启 ipv4 转发功能
# 查看是否开启 ipv4 转发
sysctl net.ipv4.ip_forward
# 开启(重启后失效)
sysctl -w net.ipv4.ip_forward=1
# 或者(重启后失效)
# echo 1 > /proc/sys/net/ipv4/ip_forward

# 改配置文件(永久生效)
cat /etc/sysctl.conf
# 本次改完还是失败,重启后失效
echo net.ipv4.ip_forward= 1 | tee -a /etc/sysctl.conf && sysctl -p
基于 iptables 开启 ipv4 转发参考 wireguard-vpn-server-on-alpine,
vi /etc/conf.d/iptables
IPFORWARD="yes"


# 开启 ip 转发
# sysctl -a |grep ipv4.ip_forward
# 仅本次生效重启后失效
# sysctl net.ipv4.ip_forward=1
# 永久生效
echo net.ipv4.ip_forward= 1 | tee -a /etc/sysctl.conf && sysctl -p
安装
# 安装 wireguard
apk add -U wireguard-tools
# 配置
cd /etc/wireguard && wg genkey | tee privatekey | wg pubkey > publickey
cat /etc/wireguard/publickey
查看 ip 为 192.168.0 网段的网卡为 vmbr0
ip addr

1: lo: <LOOPBACK,UP,LOWER_UP> mtu 65536 qdisc noqueue state UNKNOWN group default qlen 1000
    link/loopback 00:00:00:00:00:00 brd 00:00:00:00:00:00
    inet 127.0.0.1/8 scope host lo
       valid_lft forever preferred_lft forever
    inet6 ::1/128 scope host
       valid_lft forever preferred_lft forever
2: enp5s0: <BROADCAST,MULTICAST,UP,LOWER_UP> mtu 1500 qdisc pfifo_fast master vmbr0 state UP group default qlen 1000
    link/ether 0a:e0:af:d1:07:d8 brd ff:ff:ff:ff:ff:ff
3: vmbr0: <BROADCAST,MULTICAST,UP,LOWER_UP> mtu 1500 qdisc noqueue state UP group default qlen 1000
    link/ether 0a:e0:af:d1:07:d8 brd ff:ff:ff:ff:ff:ff
    inet 192.168.0.176/24 scope global vmbr0
       valid_lft forever preferred_lft forever
    inet6 fe80::8e0:afff:fed1:7d8/64 scope link
       valid_lft forever preferred_lft forever
安装 iptables
apk add iptables
编辑配置文件 vi wg0.conf,注意把 PostUp 和 PostDown 的网口参数 vmbr0 改成自己的,内容如下:
[Interface]
Address = 10.0.8.2
SaveConfig = true
ListenPort = 49152
PrivateKey = 【alpine 的私钥】
PostUp = iptables -A FORWARD -i wg0 -j ACCEPT; iptables -t nat -A POSTROUTING -o vmbr0 -j MASQUERADE
PostDown = iptables -D FORWARD -i wg0 -j ACCEPT; iptables -t nat -D POSTROUTING -o vmbr0 -j MASQUERADE

[Peer]
PublicKey = 【debian 的公钥】
AllowedIPs = 10.0.8.0/24
Endpoint = sxy21.cn:49152
PersistentKeepalive = 25
在 debian 服务器上加入 alpine 的 peer
wg set wg0 peer 【alpine 的公钥】 allowed-ips 10.0.8.2/32,192.168.0.0/24
# 删除 peer
wg set wg0 peer 【alpine 的公钥】 remove
测试
# 在 debian 服务器上
ping 10.0.8.2
ping 192.168.0.167
# 如果可以 ping 通 167 但 175 不通 一般是 ip 转发没打开
ping 192.168.0.175

# 在 alpine 服务器上
ping 10.0.8.1
mac 安装 WireGuard
客户端命令
brew install wireguard-tools
# Bottle installation failed
# Run brew update twice and brew doctor (and fix all the warnings) before creating an issue!
# 测试是否安装
wg version
查看帮助
wg help
帮助文档:
Usage: wg <cmd> [<args>]
Available subcommands:
  show: Shows the current configuration and device information
  showconf: Shows the current configuration of a given WireGuard interface, for use with `setconf'
  set: Change the current configuration, add peers, remove peers, or change peers
  setconf: Applies a configuration file to a WireGuard interface
  addconf: Appends a configuration file to a WireGuard interface
  syncconf: Synchronizes a configuration file to a WireGuard interface
  genkey: Generates a new private key and writes it to stdout
  genpsk: Generates a new preshared key and writes it to stdout
  pubkey: Reads a private key from stdin and writes a public key to stdout
# 安装
brew install wireguard-tools
# 创建目录和编辑配置文件
sudo mkdir /usr/local/etc/wireguard/
# 生成私钥,然后拷贝
wg genkey
# 生成公钥
echo 生成的私钥 | wg pubkey
#
sudo vim /usr/local/etc/wireguard/wg0.conf
内容如下:
[Interface]
PrivateKey = [mac 的私钥]
Address = 10.0.8.3/24

[Peer]
PublicKey = [debian 的公钥]
Endpoint = sxy21.cn:51820
# 通过此 Peer 可以找到 10.0.8 网段和 192.168.0 网段的 ip
AllowedIPs = 10.0.8.0/24,192.168.0.0/24
使用帮助
# 启动服务
$ sudo wg-quick up wg0
# 关闭服务
$ sudo wg-quick down wg0
# 查看WG是否启动
$ sudo wg
在 debian 服务器上增加 mac 的 peer
wg set wg0 peer [mac 的公钥] allowed-ips 10.0.8.3/32
# 删除 peer
wg set wg0 peer 【mac 的公钥】remove
centos 安装 wireguard
参考官方文档
查看版本
cat /etc/*-release

yum install -y epel-release elrepo-release
yum install -y yum-plugin-elrepo
yum install -y kmod-wireguard wireguard-tools
参考文章设置WireGuard
# 生成公钥和私钥
wg genkey | sudo tee /etc/wireguard/privatekey | wg pubkey | sudo tee /etc/wireguard/publickey
编辑配置文件 vim /etc/wireguard/wg0.conf,内如如下:
[Interface]
Address = 10.0.8.1/24
SaveConfig = true
ListenPort = 51820
# 上一步生成的私钥
PrivateKey = xxx
PostUp     = firewall-cmd --zone=public --add-port 51820/udp && firewall-cmd --zone=public --add-masquerade
PostDown   = firewall-cmd --zone=public --remove-port 51820/udp && firewall-cmd --zone=public --remove-masquerade
启动
# 启动
wg-quick up wg0
#错误提示: RTNETLINK answers: Operation not supported
# Cannot find device "wg0"

# 查看内核版本
uname -r
# 正在运行的内核:kernel-lt-5.4.174
需要升级内核,升级到 5.16 解决
wg-quick up wg0
# 错误提示: firewallD is not running
# 启动防火墙
systemctl start firewalld
systemctl status firewalld

# 启用ip 转发
# 改配置 net.ipv4.ip_forward = 1
vi /etc/sysctl.d/99-sysctl.conf
sysctl -p /etc/sysctl.d/99-sysctl.conf

yum install adb
# 添加 peer
wg set wg0 peer MLsqG20kiX7gpvY0D3W4bi/vzmxyFjHVO8zdQco3LV0= allowed-ips 10.0.0.3/24

systemctl enable wg-quick@wg0.service
wireguard 的路由功能
关于子网掩码
配置 ip 的时候经常遇到 ip/数字(如 8、16、24、32) 等情况,是什么意思?
如果子网掩码配置错误,有可能将找不到对方。
子网掩码必须和 ip 一同出现,只要配置 ip 的地方,就必须配置子网掩码。
可以单独配置,也可以合并配置。
子网掩码用来表示当前ip的前多少位是网络部分,也可以形象地表示为网络部分有多少个,网络部分之外的部分才是当前子网络。
比如 192.168.1.3 这个 ip,路由器是 192.168.1.1 。 那 192.168.1.0 ~ 192.168.1.255 就是一个子网。
子网掩码就是 255.255.255.0 也就是前三个都是"外网",只有最后一位才是内网。
用二进制表示就是前 24 位都是 1
所以用 192.168.1.3/24 就可以表示 192.168.1.3 的子网掩码是 255.255.255.0,因此 ip 与子网掩码可简写成"ip/数字"
所以局域网内的子网掩码一般为 24 或 255.255.255.0
参考教程配置安卓端
下载安卓客户端wireguard
参考文章
- WireGuard: How to access a peer’s local network
- wireGuard 安装和配置过程
- 使用 wireguard 访问公司内网
- WireGuard 教程:使用 DNS-SD 进行 NAT-to-NAT 穿透
- WireGuard 的工作原理
- 使用 WireGuard 无缝接入内网
- Mac install wireguard
- wireguard
- mac-wireguard使用
- CentOS-7 升级内核
- 如何在五分钟内装好 WireGuard
- 大白话聊 WireGuard
- 体验Wireguard的简单之美
- WireGuard 组建非对称路由
- WireGuard场景中使用策略路由定义复杂路由
- 使用电信 TR069 内网架设 WireGuard 隧道异地组网
- Tailscale 组网
- tailscale 的一些心得
Comments