使用PVE安装Alpine系统
Table of Contents
安装 alpine
虚拟机方式(不推荐)
1. 创建虚拟机 下载VIRTUAL 版本下的 alpine-virt-x86_64.iso 镜像文件。
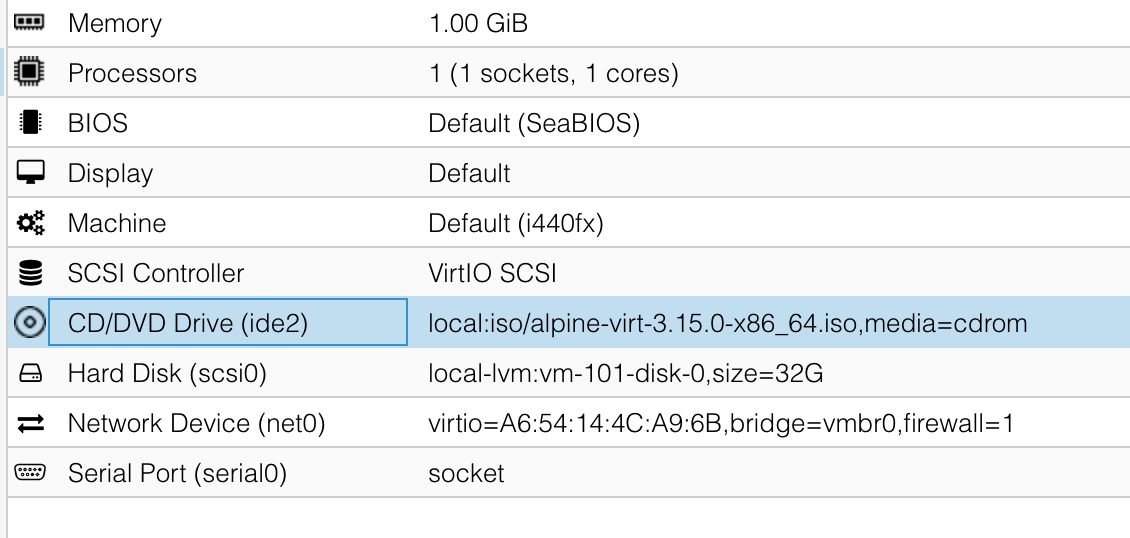
用 pve 创建一个虚拟机,挂载刚刚下载的镜像。(别忘了增加串口0,否则命令不好粘贴复制,另外设置镜像的时候无法上翻)
2. 安装过程
注: pve 【概要】下方的【控制台】不能粘贴复制命令,如需粘贴或复制命令需点击右上角的【控制台】按钮。 启动后,在 pve 机器终端用 qm 命令连接 alpine 的终端。然后参考 安装 alpine 教程进行安装,键盘布局选择
# 启动容器,然后输入命令:
qm terminal 101 -iface serial0
# (press Ctrl+O to exit)
# 之后按 control+O 退出终端)

# 安装完成直接进入 console 界面,需要输入命令 setup-alpine 开始初始化。
setup-alpine
# 键盘布局,几乎都是 QWERTY 布局
Select keyboard layout: [none] us
# 我比较常用 mac 电脑,Windows 的布局直接使用 us
Select variant (or 'abort'): us-mac
# hostname 随意
Enter system hostname (fully qualified form, e.g. 'foo.example.org') [localhost] apline-test
# 时区配置
Which timezone are you in? ('?' for list) [UTC] Asia/Shanghai
# 镜像选择
Available mirrors:
1)
...
16) mirrors.tuna.tsinghua.edu.cn # 清华
...
57) mirrors.aliyun.com # 阿里云
...

Enter mirror number (1-72) or URL to add (or r/f/e/done) [1] 16
# 参数说明
# r) 从上面的列表中添加随机数
# f) 从上面的列表中检测并添加最快的镜像
# e) 使用文本编辑器编辑 /etc/apk/repositories
# 选择 f 会所有镜像测一遍,比较慢。直接输入 16 或者 57()
# 安装到哪个磁盘
Which disk(s) would you like to use? (or '?' for help or 'none') [none] sda
# 安装类型
How would you like to use it? ('sys', 'data', 'crypt', 'lvm' or '?' for help) [?] sys
# 最后是否格式化 sda 选择 y。否则会安装失败。
WARNING: Erase the above disk(s) and continue? (y/n) [n]  y
# 重启
reboot
3. 开启启动、换源、root远程访问
如需开机启动,在 pve 的 options 界面中把 start at boot 设置成 yes。
后期如需更改源,请参考教程
# 开启 root 用户远程管理
echo "PermitRootLogin  yes" >> /etc/ssh/sshd_config
service sshd restart
使用模板 CT 方式 (推荐)
cp /etc/apk/repositories /etc/apk/repositories.bak
sed -i 's/dl-cdn.alpinelinux.org/mirrors.tuna.tsinghua.edu.cn/g' /etc/apk/repositories
apk update
- 修改时区 如果没有在安装是指定时区,可以通过如下方法更改。
date
apk add tzdata
cp /usr/share/zoneinfo/Asia/Shanghai /etc/localtime
echo "Asia/Shanghai" > /etc/timezone
apk del tzdata
date
- 开启 ssh
apk add openssh-server openssh-client
echo "PermitRootLogin  yes" >> /etc/ssh/sshd_config
rc-update add sshd # 开机启动
service sshd start
nginx 的安装和使用
nginx 安装和配置
# 安装 vim、nginx
apk add vim nginx nginx-mod-stream
# centos yum remove -y nginx && yum install -y nginx-mod-stream
# 需要手动安装 stream 模块
# 否则报错 nginx: [emerg] unknown directive "stream" in

cd /etc/nginx
# 备份文件
mv nginx.conf nginx.conf.bak
# 方便修改去掉注释行
grep -v "#" nginx.conf.bak > nginx.conf
# 最后增加一行
mkdir tcp.d
echo "include /etc/nginx/tcp.d/*.conf;" >> nginx.conf
stream 配置
# vi tcp.d/pve.conf
# pve.conf
stream{
    upstream pve{
        hash $remote_addr consistent;
        server 	10.0.0.113:8006 max_fails=3 fail_timeout=10s;
    }
    server{
        listen 8006;
        proxy_connect_timeout 20s;
        proxy_timeout 5m;
        proxy_pass pve;
    }
}
http 反向代理配置
# cat http.d/default.conf
server{
    listen 5000; # dsm
    location / {
            proxy_pass http://10.0.0.117:5000;
    }
}

server{
    listen 9117; # JackettAPI
    location / {
            proxy_pass http://10.0.0.117:9117;
    }
}
重启 nginx
mkdir -p /run/nginx/
nginx -t
nginx -s reload
wireguard 的安装和配置
参考 wireguard 官网 安装
apk update
apk add -U wireguard-tools
如果失败,需要更改/etc/apk/repositories 为官方镜像
# echo "">/etc/apk/repositories
# vi /etc/apk/repositories
#/media/cdrom/apks
http://dl-cdn.alpinelinux.org/alpine/v3.9/main
http://dl-cdn.alpinelinux.org/alpine/v3.9/community
继续安装
cd /etc/wireguard && wg genkey | tee privatekey | wg pubkey > publickey
cat /etc/wireguard/publickey
vi wg0.conf

[Interface]
Address = 10.0.8.2
SaveConfig = true
ListenPort = 49152
PrivateKey = 当前私钥

[Peer]
PublicKey = 公网的公钥
Endpoint = 你的公网:49152
AllowedIPs = 10.0.8.0/24
# Send periodic keepalives to ensure connection stays up behind NAT.
# 25 秒触发一次
PersistentKeepalive = 25
wireguard 服务端添加 peer
sudo wg set wg0 peer [peer的公钥] allowed-ips 10.0.8.2/32
启动 wg-quick up wg0
wireguard 开启/重启自动启动
如果客户端在 NAT 之后,当没有活动的数据连接,客户端就是断开,可通过 配置项 PersistentKeepalive “促活”
方法一:
查看开启启动的说明 /etc/local.d/README
编辑文件 vim /etc/local.d/wg.start,内容如下:
#!/sbin/openrc-run
wg-quick up wg0
# chmod +x /etc/local.d/wg.start
方法二
编辑配置文件 vim /etc/init.d/wg ,内容如下:
description="wg-quick wg0"
depend() {
    need net
    need localmount
}
start() {
    sysctl net.ipv4.ip_forward=1
    wg-quick up wg0
}
stop() {
    wg-quick down wg0
}
# wg-quick up wg0    #启动服务端
# wg-quick down wg0  #停止服务端
使用 OpenRC 管理 wg 服务
chmod +x /etc/init.d/wg
rc-update add wg
rc-service wg start
rc-service wg status
# rc-service wg stop
Alpine 中的 systemctl
Alpine 没有 systemctl 之类的工具,相似的工具是 awall
# apk update && apk upgrade
## Install both IPv4 and IPv6 version of IPtables ##
# apk add ip6tables iptables
## Install awall ##
# apk add -u awall
## Verify it ##
# apk version awall
配置 nginx udp 端口转发
nginx 开机启动 rc-update add nginx rc-service nginx status rc-service nginx start
安装 adb
参考 Alpine-adb
apk --update-cache --repository http://dl-3.alpinelinux.org/alpine/edge/testing/ add android-tools
Comments